

Get This Plan as a Free PDF
Complete materials list, step-by-step instructions, and product links.
Free, instant delivery. Unsubscribe anytime.
You'll also receive 4 build-tip emails over the next month to help with your project.
At a Glance
| Detail | Info |
|---|---|
| System Type | Deep Water Culture (DWC) — Raft/Float Method |
| Footprint | 24" x 48" |
| Capacity | 24 heads of lettuce within a 24" × 48" footprint |
| Difficulty | Beginner |
| Estimated Cost | $50–$80 |
| Time to Build | 2–3 hours |
| Best Crops | Lettuce (all types), spinach, arugula, watercress |
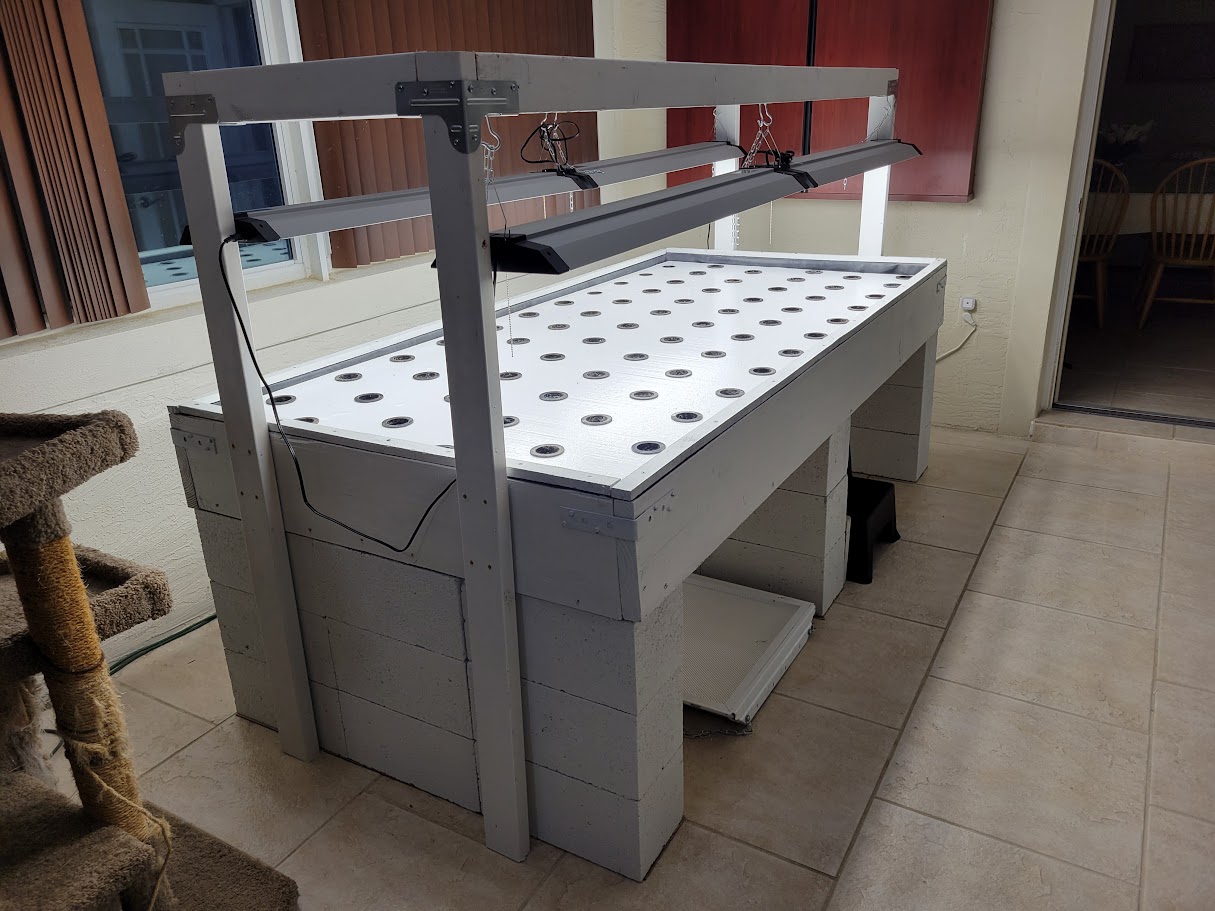
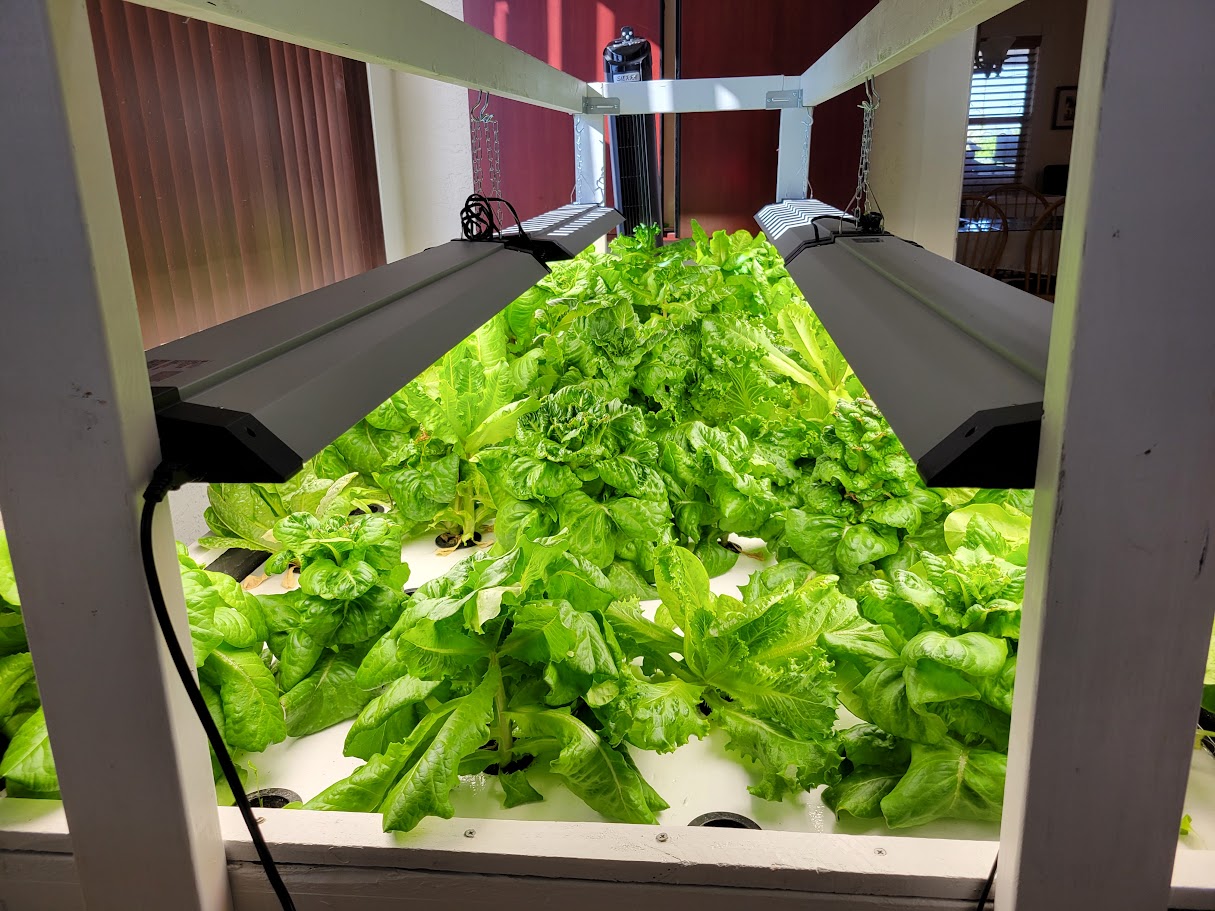
How This System Works
The floating raft method is how commercial hydroponic lettuce farms grow thousands of heads at a time, and this plan scales that proven approach down to a home-friendly 2 ft by 4 ft system. A shallow reservoir (6–8 inches deep) is filled with nutrient solution, and a sheet of rigid polystyrene foam floats on top of the water. The foam raft has holes cut into it that hold net cups or starter plugs, suspending plant roots directly in the aerated nutrient solution below.
Unlike traditional DWC where plants sit in a lid above the water, raft culture places the growing surface directly on the water. This means the raft rises and falls with the water level, so roots always stay submerged at the perfect depth. There is no gap to manage between the net cup and the water surface, making this one of the most forgiving hydroponic systems for beginners.
An air pump and air stones underneath the raft keep the nutrient solution saturated with dissolved oxygen. Because the reservoir is wide and shallow, you get excellent surface area for gas exchange even beyond what the air stones provide. The result is fast, consistent growth. Commercial raft farms regularly harvest lettuce in 28–35 days from transplant, and you can expect similar results at home.
Materials List
Our philosophy: Use what you already have. Hydroponics does not require store-bought equipment. People around the world grow food this way using recycled containers, scraps of fabric, and seeds saved from last season's harvest. The links below are for convenience if you prefer to purchase, but we encourage you to improvise with what is available to you.
This page contains affiliate links. If you purchase through them, we may earn a small commission at no extra cost to you. Learn more
Reservoir
A large, shallow container serves as the reservoir. A concrete mixing tub, mortar pan, or underbed storage container works well.
Use what you have: Any wide, shallow, opaque container will do. A concrete mixing tub from a hardware store ($8-$12) is ideal. An old under-bed storage box, a large baking pan, or even a wooden frame lined with pond liner all work. The key is 6-8 inches of depth and a wide surface area. If you want to buy a container, a 10-gallon dark storage tote works if you only fill it partway.
Net Cups
Twenty-four 2-inch or 3-inch net cups, one for each lettuce plant.
Use what you have: Cut the bottoms off small plastic cups and poke drainage holes in the sides. For a raft system, the holes in the foam hold the cups in place, so even a simple plastic cup with drainage works. If you want proper net cups, a pack of 3-inch net cups (25-pack) gives you almost exactly what you need.
Aeration
Two air stones spread across the bottom of the reservoir provide even oxygenation under the raft.
Use what you have: DWC does require an air pump for oxygenation. This is one component worth purchasing. A basic aquarium pump from a thrift store or garage sale works fine. For a new one, this aquarium air pump is reliable and quiet.
You can use bare airline tubing with small holes poked in it instead of air stones, though stones produce finer, more even bubbles across the reservoir. This cylinder air stones (4-pack) gives you two for this build plus spares.
Standard airline tubing from any pet store works, or reuse tubing from old aquarium equipment. This airline tubing kit with check valves includes everything in one package.
Growing Supplies
Use what you have: A small piece of sponge or a cotton ball holds a seed until it sprouts. For a raft system, you can even nestle seeds directly into small pieces of sponge pushed into the net cups. If you prefer something purpose-made, Rapid Rooter plugs (50-pack) are easy and consistent.
Nutrients are essential. Plants in water need dissolved minerals to grow. A single bottle lasts months. The General Hydroponics Flora Series (3-part kit) is the go-to choice.
Monitoring
Use what you have: pH test strips from a pet store or pool supply section are cheap and effective. For more precision, a digital pH and TDS meter kit helps you dial in the perfect nutrient levels.
Lighting (if growing indoors)
A single 4-ft grow light positioned above the raft covers the full growing area.
Use what you have: A sunny window provides enough light for lettuce, which is not as light-hungry as tomatoes. If growing indoors without natural light, basic 4000K LED shop lights from a hardware store work well. For a purpose-built option, these full-spectrum 4 ft LED grow lights cover the full raft area.
You can turn lights on and off by hand, but a timer makes the daily routine much simpler. Check thrift stores, or buy a programmable outlet timer.
Additional Materials (no affiliate link)
- 1x sheet of 1.5-inch thick rigid polystyrene insulation foam (extruded, not beaded/EPS), cut to fit inside the reservoir
- Utility knife or hot wire foam cutter for cutting the raft
- Reflective material or white paint for the reservoir exterior (optional)
Tools
Use what you have: Trace a net cup on the foam and cut with a utility knife. For cutting the foam raft, a sharp knife is all you really need. If you are also cutting holes in a tote lid, a 3-inch hole saw makes cleaner cuts.
- Utility knife
- Ruler and marker
- Sandpaper (120 grit)
- Drill with 3/8-inch bit (for airline port)
Build Instructions
Step 1: Prepare the Reservoir
If using a concrete mixing tub, rinse it thoroughly. If using a storage tote, you will only fill it 6–8 inches deep. Drill a 3/8-inch hole near the top of one short side for the airline tubing to enter. If the container is translucent, wrap the outside with reflective material or paint it to block light.
Step 2: Cut the Foam Raft
Measure the inside dimensions of your reservoir. Cut the polystyrene foam sheet to fit inside with about 1/4 inch of clearance on each side so it can float freely without binding against the walls. The raft should be 1 to 1.5 inches thick for good buoyancy.
Step 3: Drill the Plant Holes
Mark a 4x6 grid of holes on the raft, spaced 5 to 6 inches apart center-to-center. This gives you 24 planting sites. Using a 2-inch or 3-inch hole saw (matching your net cup size), carefully drill through the foam. Work slowly to avoid cracking the foam. Clean up any rough edges with sandpaper.
Step 4: Install the Air System
Safety Warning: Always use a GFCI-protected outlet for the air pump. Create a drip loop in the cord.
- Connect two air stones to the dual-outlet air pump with airline tubing
- Thread the tubing through the airline port in the reservoir wall
- Place the two air stones on the bottom of the reservoir, evenly spaced along the length
- The raft will float above the air stones, so position them where they will not catch on the foam
Step 5: Fill the Reservoir
Fill the reservoir with 6–8 inches of clean water. Mix nutrients to an EC of 0.8–1.2 mS/cm. Adjust pH to 5.5–6.5. The water depth should be enough that the foam raft floats with at least 1/2 inch of water above the bottom of the net cups.
Step 6: Float the Raft and Plant
Place the foam raft on the water surface. It should float level and stable. Insert net cups filled with a small amount of hydroton and a seedling in a starter plug into each hole. The bottom of the starter plug should touch or sit just in the water. The raft's buoyancy keeps everything at the right depth automatically.
Step 7: Start the System
Turn on the air pump and verify bubbles are rising evenly from both air stones beneath the raft. Position the grow light 8–12 inches above the raft surface. Set the timer for 16 hours on / 8 hours off. Within a few days, you should see roots growing down through the net cups into the nutrient solution.
Nutrient Guide
| Stage | EC (mS/cm) | pH | Notes |
|---|---|---|---|
| Seedling (week 1–2) | 0.5–0.8 | 5.8–6.2 | Half-strength greens formula |
| Rapid growth (week 2–3) | 0.8–1.2 | 5.5–6.5 | Full-strength greens formula |
| Harvest size (week 3–5) | 1.0–1.4 | 5.5–6.5 | Maintain or slightly increase as plants mature |
Crop Suggestions
| Crop | Days to Harvest | Notes |
|---|---|---|
| Butterhead lettuce | 28–40 days | The classic raft crop; compact, tender heads |
| Romaine lettuce | 35–50 days | Taller heads; harvest outer leaves or whole head |
| Loose-leaf lettuce | 25–35 days | Fastest lettuce type, cut-and-come-again harvest |
| Spinach | 30–45 days | Prefers cooler water (below 68 F); bolts in heat |
| Arugula | 20–30 days | Spicy flavor, very fast grower |
| Watercress | 25–35 days | Naturally aquatic, thrives in raft systems |
| Baby kale | 25–35 days | Harvest young for tender salad greens |
| Mustard greens | 20–30 days | Peppery flavor, fast and easy |
Estimated Cost
| Item | Estimated Price |
|---|---|
| Shallow reservoir (mixing tub or tote) | $8–$14 |
| Polystyrene foam sheet (2 ft x 4 ft) | $5–$8 |
| 24x 2- or 3-inch net cups | $6–$10 |
| Dual-outlet air pump | $10–$15 |
| 2x air stones | $3–$5 |
| Airline tubing (10 ft) | $3–$4 |
| Starter plugs (pack) | $5–$8 |
| Nutrients (greens formula) | $10–$16 |
| Total | $50–$80 |
Tips & Troubleshooting
| Problem | Likely Cause | Solution |
|---|---|---|
| Raft tips to one side | Uneven plant weight or raft binding on wall | Trim raft for even clearance; distribute plant sizes evenly across the raft |
| Lettuce bolts (sends up flower stalk) | Water temperature above 75 F or excessive light | Keep water cool; reduce light to 14 hours; use bolt-resistant varieties |
| Roots tangling between adjacent plants | Plants too close together | Space holes at least 5 inches apart; harvest promptly when heads reach full size |
| Algae on raft surface | Light reaching nutrient solution | Cover exposed foam with white plastic or food-safe paint; block light at reservoir edges |
| Weak or leggy seedlings | Light too far from raft | Lower grow light to 6–8 inches above seedlings |
| Foam raft absorbs water over time | Using beaded EPS foam instead of extruded XPS | Replace with extruded polystyrene (XPS), which has a closed-cell structure and does not absorb water |
General tips:
- Use extruded polystyrene (XPS, often blue or pink board insulation), not white beaded Styrofoam, which crumbles and absorbs water
- Start new seedlings in a separate tray so you always have transplants ready when you harvest a head
- For continuous harvest, replant each hole immediately after harvesting
- This system uses less water than traditional DWC because the raft reduces evaporation from the surface
Maintenance Schedule
Daily
- Visual check: air pump running, raft floating level, plants look green and healthy
- Check for any pest activity (fungus gnats are the most common indoor pest for lettuce)
Weekly
- Test pH and EC; adjust as needed
- Top off reservoir if water level has dropped (add pH-adjusted water or dilute nutrient solution)
- Harvest any heads that have reached full size
Every 2–3 Weeks
- Full water change: lift the raft out, dump and rinse the reservoir, refill with fresh nutrient solution
- Rinse the air stones and check for reduced bubble output
- Inspect the underside of the raft for root debris or algae; rinse gently
Monthly
- Scrub the reservoir walls to remove mineral deposits
- Check airline tubing for wear and replace if needed
- Inspect the foam raft for waterlogging or crumbling; replace if degraded
- Verify air pump output is still strong
Frequently Asked Questions
What type of foam should I use for the floating raft?
Use extruded polystyrene foam (XPS), which is the rigid pink or blue insulation board sold at hardware stores. Do not use white beaded Styrofoam (EPS), because it absorbs water over time, crumbles into small beads that clog your system, and loses buoyancy. XPS has a closed-cell structure that stays waterproof and floats consistently for months.
How many heads of lettuce can I harvest per month with this system?
With 24 planting sites and a typical lettuce growth cycle of 30 to 40 days, you can harvest around 24 heads per month if you replant each hole immediately after harvesting. Stagger your plantings by starting a few new seedlings every week so you always have heads reaching maturity.
Can I use this raft system outdoors?
You can, but you will need to manage water temperature and direct sunlight more carefully. Keep the reservoir shaded to prevent overheating and algae growth, and use a light-colored or reflective cover around the container. Lettuce prefers cooler water below 72 degrees Fahrenheit, so outdoor raft systems work best in spring and fall rather than midsummer heat.
How deep does the water need to be for a floating raft system?
The reservoir should be six to eight inches deep. This provides enough water volume to keep nutrient concentrations stable and enough depth for roots to grow freely below the raft. Shallower water runs out of nutrients faster and heats up more quickly, while deeper water is unnecessary and wastes nutrient solution.
Complete Lettuce Raft Build
Complete Shopping List
Everything you need to build this system. Check off items you already have.
This list contains affiliate links. We may earn a small commission at no extra cost to you.
DWC Hydroponic Bucket Kit (5 Gallon)
Complete 5-gallon DWC kit: bucket with lid, 6" net cup, air pump, air stone, tubing, clay pebbles, pH test kit
This is the exact kit I recommend to every first-time grower. Everything fits together out of the box, so you can focus on learning instead of troubleshooting your setup. -- Paul
Budget option: Any food-safe 5-gallon bucket with a lid works. Drill a hole for the net cup and add a cheap aquarium air pump. Total DIY cost is around $15.
Dark Storage Tote (10 gal)
10-gallon opaque storage tote with snap-on lid, dark color to block light
The dark color is important. Clear or translucent totes let light in, which causes algae growth. If you have a light-colored tote, just wrap it in foil tape. -- Paul
Budget option: Any opaque container with a lid works. Dark-colored storage bins from the dollar store are fine for getting started.
3-inch Net Cups
VIVOSUN 3-inch heavy-duty net cups with plant labels, 25-pack
Budget option: You can make DIY net cups from plastic drinking cups by poking holes in the sides and bottom with a soldering iron.
Aquarium Air Pump
Adjustable aquarium air pump, dual outlet, quiet operation, up to 100 gallon
Dissolved oxygen is the secret weapon of DWC. This pump is quiet enough for a bedroom setup and powerful enough for a 10-gallon reservoir. -- Paul
Budget option: Any aquarium air pump with an air stone will work. Size it to at least 1 watt per gallon of reservoir volume.
Cylinder Air Stones
4-inch cylinder air stone, 4-pack, fine bubble diffusion for DWC
Airline Tubing
Standard airline tubing, 25 ft, with air stones, check valves, and connectors
Seed-Starting Plugs
General Hydroponics Rapid Rooter seed-starting plugs, 50-pack
Rapid Rooters have the best germination rate of anything I have tested. Seeds sprout in 2-3 days and the roots grow right out the bottom into your net cup. -- Paul
Budget option: Rockwool cubes or even a damp paper towel will germinate seeds. Rapid Rooters are a convenience, not a necessity.
Hydroponic Nutrients (Flora Series)
General Hydroponics Flora Series 3-part liquid nutrient kit, 1 quart each
I have tried a dozen nutrient brands over the years. The Flora Series keeps winning because the three-part system lets you adjust ratios for any crop without buying separate formulas. -- Paul
Budget option: Masterblend 4-18-38 is a great dry nutrient option at a fraction of the cost per gallon. Our Nutrient Calculator supports both brands.
pH & TDS Meter Kit
VIVOSUN digital pH meter + TDS/EC meter combo kit, 0.01 pH accuracy
If I could only buy one tool, this would be it. Most problems I diagnose in the Plant Doctor come down to pH being off. Checking takes 10 seconds and saves weeks of frustration. -- Paul
0 of 9 items checked off
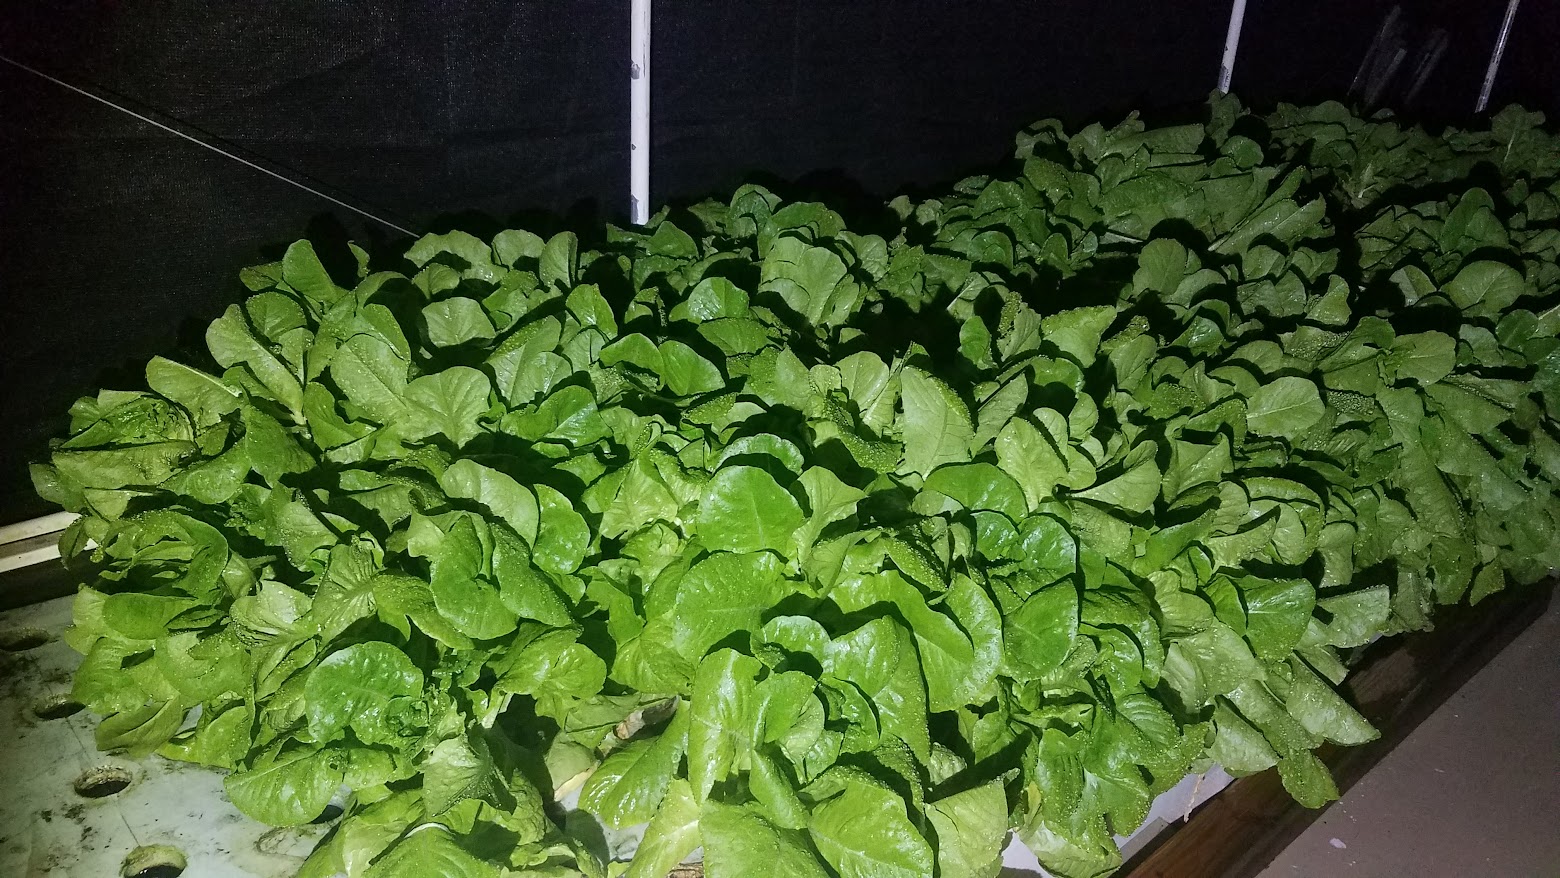
Photo Gallery
Click any image to enlarge.


I Built This!
Share a photo of your completed build. Photos are reviewed before appearing in the gallery.
Ask AI About This Plan
Chat with our AI assistant - answers are grounded in this plan's content.
Take This Plan With You
Get a printable PDF with the complete materials list and build instructions.
Free, instant delivery. We respect your privacy.
You'll also receive 4 build-tip emails over the next month to help with your project.
You Might Also Like
DWC 18-Plant Storage Tote System
Two 27-gallon totes with 9 plants each create an 18-plant lettuce and herb factory. Simple DWC with shared air pump.
DIY 5-Gallon Bucket Hydroponic System
The most popular DIY hydroponic project in the world. Build a complete Deep Water Culture system in 30 minutes with a 5-gallon bucket, air pump, and nutrient solution. Grows lettuce, herbs, peppers, and tomatoes.
Classroom Hydroponic System (Easy STEM Project)
A simple floating raft DWC system designed for classrooms. Grows 8-12 plants on a single table, teaches biology, chemistry, and engineering. Perfect for STEM programs and science fairs.
Support Free Plans
If this plan helped you, the best way to support the site is to share it with a friend or use our affiliate links when purchasing materials. This helps us keep creating free hydroponic building plans for everyone.
Share with a Friend
Comments
No ratings yet — be the first to rate this plan!
Leave a Comment